


УРОК №2
|
|
 Верх шарика - самое освещенное место. Поэтому рисуем эллипс, который будет самой освещенной частью, заливаем белым цветом и добавляем прозрачности (рис. 4) при помощи инструмента "интерактивная прозрачность" с направлением сверху вниз. Низ шара хоть и находится в тени, но тем не менее слабо освещен отраженным светом, поэтому копируем наш «верхний эллипс» и уменьшив его размер размещаем снизу (рис. 5) у нашего шарика (яркость заливки нужно уменьшить при помощи все той же «рюмки») Все, наш шар готов к употреблению; дополнительно можно его украсить снежинками (рис. 6). Если нужно быстро нарисовать простенькую новогоднюю елочку – делаем несколько таких шариков разного цвета, рисуем зеленый треугольник (копируем его три раза), добавляем сверху звездочку – и вот (см. рис.) ёлочка готова.
 Если требуется более проработанный рисунок (например новогодняя открытка с еловой веткой) – украшаем наш шар снежинками (рис. 6). Заливаем фон открытки синим градиентом (можно использовать все ту же «рюмку»).
 Рисуем еловую веточку (степень «похожести» зависит от индивидуальных рисовательных способностей) в таком порядке: 1 – контур, 2 – заливка градиентом, 3 – прорисовка пушистости ветки: клонируем эллипсы разного размера тем же способом, каким рисовали места освещенности в шарике (см. рис). Теперь с помощью одной нарисованной веточки и функции copy => paste можно создать целый еловый бор, но я ограничился тремя ветками. Дальше просто поверх фона размещаем нашу еловую лапу (можно накидать сверху немного снега). Поверх еловой лапы размещаем шарик. Снежинки и сугробы добавляем по вкусу.
 УРОК №3
СЕТКИ И ПЕРЕТЕКАНИЯ
УРОК №3
СЕТКИ И ПЕРЕТЕКАНИЯ
 1.Откройте новый документ и выберите в палитре инструментовИнструмент интеллектуального рисования (Shift+S). Назовем его карандаш, для простоты.
 2.Нарисуйте карандашом какую-нибудь линию с всякими загогулинами, например такую, как у меня
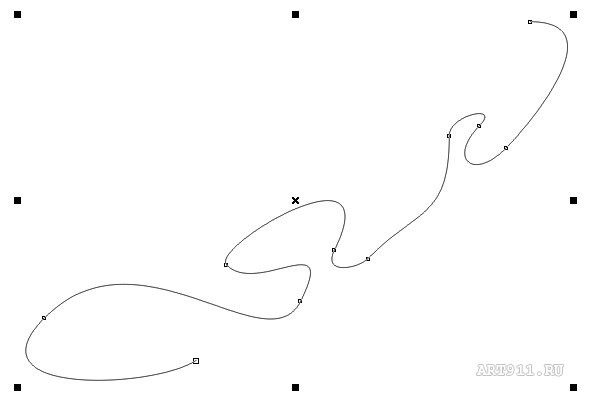 Работаем им, как обычным карандашом, ничего страшного, если линия получится не совсем такой, какую Вы хотели, на то он и интеллектуальный, что сам подправит рисунок. Ну, а, если, что-то не получилось, берём инструмент Форма (F10) и подправляем кривую в выделенных узлах (выделить узел - 1клик левой кнопкой мыши)
 3. Дублируем нашу линию, и переносим её, как на примере. Есть разные способы: а - (Ctrl+D) или б - выделяем нашу линию левой кнопкой мыши, щелкаем на клавиатуре на +, или в - выделяем нашу линию левой кнопкой мыши инструментом Указатель, переносим её куда необходимо и не отпуская левой кнопки мыши кликнем правой. В общем, думаю, Вы найдёте лучший для себя способ.
 4.Чтобы наша вуаль получилась с растяжкой цвета, как на примере, большую линию делаем, синим цветом: C100M100Y0K0, маленькую - белым. Для того, чтоб вуаль лучше было видно, сделайте фон.
 Выберите инструмент интерактивное перетекание и потяните курсором от одного объекта к другому, со значением 20 шагов

 В итоге получаем искомую вуаль

 УРОК №4
Рисуем бабочку в CorelDRAW
Доброго времени суток уважаемые посетители сайта, предлагаю выполнить вам красочный урок по рисованию бабочки.См. Рис. 1
УРОК №4
Рисуем бабочку в CorelDRAW
Доброго времени суток уважаемые посетители сайта, предлагаю выполнить вам красочный урок по рисованию бабочки.См. Рис. 1
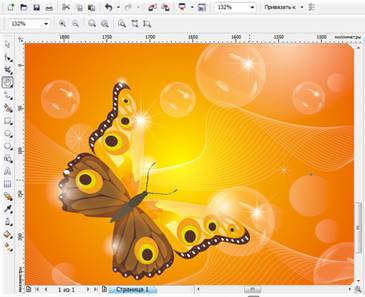
 Рис. 1
Рассмотрим инструменты которые нам понадобятся:
· Инструмент "Перо","Ломаная линия"
· «Форма» F10
· Инструменты «Эллипс» F7, "Звезда"
· Инструмент "Интерактивная заливка"(G)
· "Прозрачность"
· Инструмент "Тень"
· "Нож"
· "Интеллектуальная заливка"
· Инструмент "Перетекание"
· Инструмент "Power Clip"
Приступим к выполнению урока. Нарисуем тело бабочки. Возьмите инструмент«Эллипс» F7. Построите им два объекта туловища бабочки, далее преобразуйте их в кривые (правая кнопка мыши по эллипсу, в появившемся меню выбрать"Преобразовать в кривую"). Теперь возьмите инструмент «Форма» F10. Добавляя новые узлы и перемещая старые либо изменяя тип узлов, или перемещая опорные точки данных узлов, видоизмените эллипсы.См. Рис.2
Рис. 1
Рассмотрим инструменты которые нам понадобятся:
· Инструмент "Перо","Ломаная линия"
· «Форма» F10
· Инструменты «Эллипс» F7, "Звезда"
· Инструмент "Интерактивная заливка"(G)
· "Прозрачность"
· Инструмент "Тень"
· "Нож"
· "Интеллектуальная заливка"
· Инструмент "Перетекание"
· Инструмент "Power Clip"
Приступим к выполнению урока. Нарисуем тело бабочки. Возьмите инструмент«Эллипс» F7. Построите им два объекта туловища бабочки, далее преобразуйте их в кривые (правая кнопка мыши по эллипсу, в появившемся меню выбрать"Преобразовать в кривую"). Теперь возьмите инструмент «Форма» F10. Добавляя новые узлы и перемещая старые либо изменяя тип узлов, или перемещая опорные точки данных узлов, видоизмените эллипсы.См. Рис.2
 Рис. 2
Примечание. Если у вас возникнут вопросы по работе с узлами инструментом"Форма". Вы можете включить режим динамической справки "Советы" (справка будет отображаться справа в прикрепленном окне). Выберите сверху в текстовом меню "Окна" -"Окна настройки"- "Советы" См. Рис. 3
Рис. 2
Примечание. Если у вас возникнут вопросы по работе с узлами инструментом"Форма". Вы можете включить режим динамической справки "Советы" (справка будет отображаться справа в прикрепленном окне). Выберите сверху в текстовом меню "Окна" -"Окна настройки"- "Советы" См. Рис. 3
 Рис.3
Таким же образом, используя эллипс, постройте глаз и усы нашей будущей бабочке. См. Рис. 4
Рис.3
Таким же образом, используя эллипс, постройте глаз и усы нашей будущей бабочке. См. Рис. 4
 Рис.4
Нарисуем крылья бабочки. Решить данную задачу можно как минимум двумя способами. Первый способ, подходить больше новичкам. Возьмите инструмент "Ломаная линия". Далее постройте ломаный, упрощенный контур крыльев. Возьмите инструмент"Форма" F10. Выделите, набросив лассо, все узлы. Кликните правой кнопкой мыши не снимая выделения по любому из узлов. В появившемся меню выберите пункт "Преобразовать в кривую". После данной операции, отредактируйте инструментом "Форма" сегменты кривой. См. Рис. 5
Рис.4
Нарисуем крылья бабочки. Решить данную задачу можно как минимум двумя способами. Первый способ, подходить больше новичкам. Возьмите инструмент "Ломаная линия". Далее постройте ломаный, упрощенный контур крыльев. Возьмите инструмент"Форма" F10. Выделите, набросив лассо, все узлы. Кликните правой кнопкой мыши не снимая выделения по любому из узлов. В появившемся меню выберите пункт "Преобразовать в кривую". После данной операции, отредактируйте инструментом "Форма" сегменты кривой. См. Рис. 5

 Рис. 5
Второй способ, более подходить опытным пользователям. В основе его лежит использование инструмента "Перо" либо "Безье". При помощи данного инструмента возможно построить контур крыльев за одни раз.См. Рис. 6. Более подробно здесь "Кривые Безье. От новичка до профессионала"
Рис. 5
Второй способ, более подходить опытным пользователям. В основе его лежит использование инструмента "Перо" либо "Безье". При помощи данного инструмента возможно построить контур крыльев за одни раз.См. Рис. 6. Более подробно здесь "Кривые Безье. От новичка до профессионала"

 Рис.6
Построим кайму в левой части крыльев бабочки. Создайте копию крыла(выделить объект и нажать клавишу (+)). Сместите немного копию крыла влево. Возьмите инструмент "Интеллектуальная заливка". Нажмите инструментом по форме, которая получилась пересечением крыла и его копии. См. Рис.7
Рис.6
Построим кайму в левой части крыльев бабочки. Создайте копию крыла(выделить объект и нажать клавишу (+)). Сместите немного копию крыла влево. Возьмите инструмент "Интеллектуальная заливка". Нажмите инструментом по форме, которая получилась пересечением крыла и его копии. См. Рис.7

 Рис. 7
Построим объекты имитирующие прожилки на крыльях бабочки. Для этого можно воспользоваться инструментом "Свободная форма", "Ломаная линия" либо"Безье". Также инструментом "Эллипс" постройте небольшие чередующиеся пятна на краях крыльев. См. Рис. 8
Рис. 7
Построим объекты имитирующие прожилки на крыльях бабочки. Для этого можно воспользоваться инструментом "Свободная форма", "Ломаная линия" либо"Безье". Также инструментом "Эллипс" постройте небольшие чередующиеся пятна на краях крыльев. См. Рис. 8
 Рис.8
Используя инструмент "Эллипсис"постройте пятна на крыльях бабочки.См. Рис. 9
Рис.8
Используя инструмент "Эллипсис"постройте пятна на крыльях бабочки.См. Рис. 9
 Рис. 9
Нарисуйте объект у основания верхнего крыла бабочки. Для этого создайте копию крыла. Далее возьмите инструмент "Нож", разделите им объект по необходимой кривой, ненужную часть объекта удалите.См. Рис.10
Примечание. Инструмент "Нож" не заменим, когда необходимо быстро разделить объект на несколько независимых частей.
Рис. 9
Нарисуйте объект у основания верхнего крыла бабочки. Для этого создайте копию крыла. Далее возьмите инструмент "Нож", разделите им объект по необходимой кривой, ненужную часть объекта удалите.См. Рис.10
Примечание. Инструмент "Нож" не заменим, когда необходимо быстро разделить объект на несколько независимых частей.

 Рис. 10
Займемся цветом. Если вы будете использовать свои цвета, позвольте я дам пару советов вам по подбору цветов. Конечно можно полагаться на свой вкус, но иногда проще обратится к специализированным инструментам.
В программе CorelDRAW присутствует инструмент " Краскосмеситель"-"Гармония цветов ", который помогает подобрать цвета для вашего будущего проекта основываясь на гармонии цвета. Поучимся использовать его. __________________________________________________ Примечание: Гармония цветов получается в результате наложения фигуры, например прямоугольника или треугольника, на цветовой круг. Каждая вертикальная строка цветовой сетки начинается с цвета, расположенного на одной из вершин накладываемой фигуры.
Цвета всех углов фигуры всегда являются дополнительными, контрастными или гармоничными, что зависит от выбранной фигуры. Гармония цветов позволяет выбирать необходимую цветовую модель и наиболее полезна, когда для проекта нужно выбрать несколько цветов.
__________________________________________________
Постройте три прямоугольника. Залейте их оранжевым цветом. Далее выделите один из прямоугольников, нажмите правую кнопку, в появившемся меню выберите"Свойства", далее справа в прикрепленном окне нажмите кнопку "Заливка" - "Дополнительно". В появившимся окне сверху нажмите вкладку "Краскосмесители" См. Рис. 11
Рис. 10
Займемся цветом. Если вы будете использовать свои цвета, позвольте я дам пару советов вам по подбору цветов. Конечно можно полагаться на свой вкус, но иногда проще обратится к специализированным инструментам.
В программе CorelDRAW присутствует инструмент " Краскосмеситель"-"Гармония цветов ", который помогает подобрать цвета для вашего будущего проекта основываясь на гармонии цвета. Поучимся использовать его. __________________________________________________ Примечание: Гармония цветов получается в результате наложения фигуры, например прямоугольника или треугольника, на цветовой круг. Каждая вертикальная строка цветовой сетки начинается с цвета, расположенного на одной из вершин накладываемой фигуры.
Цвета всех углов фигуры всегда являются дополнительными, контрастными или гармоничными, что зависит от выбранной фигуры. Гармония цветов позволяет выбирать необходимую цветовую модель и наиболее полезна, когда для проекта нужно выбрать несколько цветов.
__________________________________________________
Постройте три прямоугольника. Залейте их оранжевым цветом. Далее выделите один из прямоугольников, нажмите правую кнопку, в появившемся меню выберите"Свойства", далее справа в прикрепленном окне нажмите кнопку "Заливка" - "Дополнительно". В появившимся окне сверху нажмите вкладку "Краскосмесители" См. Рис. 11
 Рис. 12
Выберите оттенок например "Треугольник 1". Программа нам предложила следующие цвета в сочетание нашему оранжевому цвету -это желто-оранжевый и синий (смотрите под цветовым кругом). Выберите один из предложенных цветов и нажмите кнопку ОК. См. Рис. 13
Рис. 12
Выберите оттенок например "Треугольник 1". Программа нам предложила следующие цвета в сочетание нашему оранжевому цвету -это желто-оранжевый и синий (смотрите под цветовым кругом). Выберите один из предложенных цветов и нажмите кнопку ОК. См. Рис. 13
 Рис.13
Помимо встроенного инструмента по подбору цвета в программе CorelDRAW. Вы также можете воспользоваться сервисом сайта http://colory.ru/. Также я рекомендую к прочтению книгу "Гармония цвета" (полное практическое руководство по созданию цветовых комбинаций; авторы Т.Саттон и Б.Вилен)http://www.libkruz.com/books/5959.html
Приступим к раскрашиванию крыльев бабочки. Верхнее крыло залейте"Интерактивной заливкой", нижнее крыло и объекты края, элементы туловища-однородной заливкой. См. Рис. 14
Рис.13
Помимо встроенного инструмента по подбору цвета в программе CorelDRAW. Вы также можете воспользоваться сервисом сайта http://colory.ru/. Также я рекомендую к прочтению книгу "Гармония цвета" (полное практическое руководство по созданию цветовых комбинаций; авторы Т.Саттон и Б.Вилен)http://www.libkruz.com/books/5959.html
Приступим к раскрашиванию крыльев бабочки. Верхнее крыло залейте"Интерактивной заливкой", нижнее крыло и объекты края, элементы туловища-однородной заливкой. См. Рис. 14
 Рис.14
Затеним края крыльев бабочки. Для этого создайте копии крыльев бабочки, уберите заливку, задайте необходимую толщину конурам крыльев.
Примените инструмент "Тень" к копиям крыльев. Настройки тени следующие: непрозрачность тени около 97, размытие тени 14-19, режим прозрачности(важно) - обычный, цвет тени- оранжевый. См. Рис. 15
Рис.14
Затеним края крыльев бабочки. Для этого создайте копии крыльев бабочки, уберите заливку, задайте необходимую толщину конурам крыльев.
Примените инструмент "Тень" к копиям крыльев. Настройки тени следующие: непрозрачность тени около 97, размытие тени 14-19, режим прозрачности(важно) - обычный, цвет тени- оранжевый. См. Рис. 15
 Рис.15
Отделите тень от конура крыльев, для этого нажмите правой кнопкой мыши инструментом "Тень" по границе объекта и тени, в выпадающем меню выберите"Разъединить группа тени". См. Рис. 16
Рис.15
Отделите тень от конура крыльев, для этого нажмите правой кнопкой мыши инструментом "Тень" по границе объекта и тени, в выпадающем меню выберите"Разъединить группа тени". См. Рис. 16
 Рис.16
Оставите тень а конур крыльев удалите.Выделите объекты теней и нажмите клавишу +, тем самым вы создадите копию по верх выделенных объектов (в данном примере это усилит насыщенность теней)
Далее воспользуемся инструментом "Power Clip". При помощи данного инструмента созданную нами тень, мы поместим внутрь крыльев бабочки. Чтобы воспользоваться инструментом вам необходимо сначала выделить объект созданной нами тени, далее вверху выбрать текстовую вкладку "Эффекты" -"Power Clip"- "Поместить в контейнер", далее появившемся большим указателем-стрелкой, кликнуть левой кнопкой мыши по крылу бабочки. См. Рис. 17
Рис.16
Оставите тень а конур крыльев удалите.Выделите объекты теней и нажмите клавишу +, тем самым вы создадите копию по верх выделенных объектов (в данном примере это усилит насыщенность теней)
Далее воспользуемся инструментом "Power Clip". При помощи данного инструмента созданную нами тень, мы поместим внутрь крыльев бабочки. Чтобы воспользоваться инструментом вам необходимо сначала выделить объект созданной нами тени, далее вверху выбрать текстовую вкладку "Эффекты" -"Power Clip"- "Поместить в контейнер", далее появившемся большим указателем-стрелкой, кликнуть левой кнопкой мыши по крылу бабочки. См. Рис. 17

 Рис. 17
Если вас не устроит расположение объекта теней внутри объектов крыльев бабочки, вы можете отредактировать положение. Для этого кликните правой кнопкой мыши по объекту крыла-контейнера, и в появившемся меню выберите"Редактировать содержимое". См. Рис. 18
Рис. 17
Если вас не устроит расположение объекта теней внутри объектов крыльев бабочки, вы можете отредактировать положение. Для этого кликните правой кнопкой мыши по объекту крыла-контейнера, и в появившемся меню выберите"Редактировать содержимое". См. Рис. 18

 Рис. 18
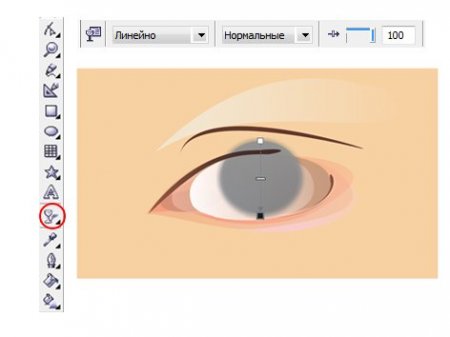
Закрасим пятна на крыльях бабочки. Для нижнего крыла примените однородную оранжевую заливку R247 G172 B7. Пятна верхнего крыла залейте белым цветом. Далее примените ко всем пятнам линейную прозрачность. См. Рис. 19
Рис. 18
Закрасим пятна на крыльях бабочки. Для нижнего крыла примените однородную оранжевую заливку R247 G172 B7. Пятна верхнего крыла залейте белым цветом. Далее примените ко всем пятнам линейную прозрачность. См. Рис. 19

 Рис.19
Залейте пятна на крыльях бабочки ранее использованными цветами.
Получим зеркальную копию крыла бабочки. Для этого выделите все объекты входящие в крыло, далее сверху на панели инструментов нажмите кнопку "Отразить по горизонтали". См. Рис.20
Рис.19
Залейте пятна на крыльях бабочки ранее использованными цветами.
Получим зеркальную копию крыла бабочки. Для этого выделите все объекты входящие в крыло, далее сверху на панели инструментов нажмите кнопку "Отразить по горизонтали". См. Рис.20
 Рис. 20
Создадим задний фон для нашей композиций. Он будет состоять из фона залитого градиентной заливкой, абстрактной композиции из линий, пузырьков, и бликов. См. Рис.21
Рис. 20
Создадим задний фон для нашей композиций. Он будет состоять из фона залитого градиентной заливкой, абстрактной композиции из линий, пузырьков, и бликов. См. Рис.21
 Рис. 21
Постройте инструментом "Прямоугольник"F6 прямоугольник. Далее возьмите инструмент "Форма"F10 и закруглите им углы прямоугольника.
Залейте прямоугольник "Интерактивной заливкой"G, тип заливки - радиальная.См. Рис.22
Рис. 21
Постройте инструментом "Прямоугольник"F6 прямоугольник. Далее возьмите инструмент "Форма"F10 и закруглите им углы прямоугольника.
Залейте прямоугольник "Интерактивной заливкой"G, тип заливки - радиальная.См. Рис.22
 Рис. 22
Займемся рисование пузырька. Постройте инструментом "Эллипс", "Ломанная линия", "Перо" следующие объекты. См. Рис. 23
Рис. 22
Займемся рисование пузырька. Постройте инструментом "Эллипс", "Ломанная линия", "Перо" следующие объекты. См. Рис. 23
 Рис.23
Залейте все объекты, кроме одной большой окружности, белым цветом. И примените к ним "Линейную прозрачность."См. Рис. 24
Рис.23
Залейте все объекты, кроме одной большой окружности, белым цветом. И примените к ним "Линейную прозрачность."См. Рис. 24
 Рис. 24
Постройте еще две окружности и примените к ним "Прозрачность", тип - радиальная, также поменяйте ползунки в инструменте прозрачность местами, черный по центру, белый на край. Таким образом мы получим, что прозрачность будет плавно увеличиваться от центра к краям.
См. Рис. 25
Рис. 24
Постройте еще две окружности и примените к ним "Прозрачность", тип - радиальная, также поменяйте ползунки в инструменте прозрачность местами, черный по центру, белый на край. Таким образом мы получим, что прозрачность будет плавно увеличиваться от центра к краям.
См. Рис. 25
 Рис.25
У нас осталась еще одна окружность не залитая белым цветом. Придайте толщину ее контуру, далее примените к ней инструмент "Тень". Настройки тени следующие: непрозрачность около 50, размытие -15, цвет белый, режим наложения(обязательно) -обычный. См. Рис. 26
Рис.25
У нас осталась еще одна окружность не залитая белым цветом. Придайте толщину ее контуру, далее примените к ней инструмент "Тень". Настройки тени следующие: непрозрачность около 50, размытие -15, цвет белый, режим наложения(обязательно) -обычный. См. Рис. 26
 Рис. 26
Отделите тень от окружности, окружность удалите. Подобную операцию мы (проделывали с тенями для крыльев бабочки). Далее поместите тень используя инструмент "Power Clip" в большую окружность залитую белым цветом (данную операцию мы также проделывали с крыльями бабочки). Построим звезду для усиления эффекта блика. Возьмите инструмент "Звезда" постройте им необходимых размеров звезду, далее задайте ей,сверху на панели свойств, количество лучей - 8, возьмите инструмент "Форма", сдвиньте данным инструментом лучи в цент звезды. Примените к объекту звезды радиальную прозрачность. См. Рис. 27
Рис. 26
Отделите тень от окружности, окружность удалите. Подобную операцию мы (проделывали с тенями для крыльев бабочки). Далее поместите тень используя инструмент "Power Clip" в большую окружность залитую белым цветом (данную операцию мы также проделывали с крыльями бабочки). Построим звезду для усиления эффекта блика. Возьмите инструмент "Звезда" постройте им необходимых размеров звезду, далее задайте ей,сверху на панели свойств, количество лучей - 8, возьмите инструмент "Форма", сдвиньте данным инструментом лучи в цент звезды. Примените к объекту звезды радиальную прозрачность. См. Рис. 27
 Рис. 27
Соберем наши разрозненные объекты в единое целое и тем самым получим симпатичный прозрачный пузырь. См. Рис. 28
Рис. 27
Соберем наши разрозненные объекты в единое целое и тем самым получим симпатичный прозрачный пузырь. См. Рис. 28
 Рис. 28
Разнообразим нашу композицию абстрактным элементом из линий. Возьмите инструмент "Свободная форма"F5.Постройте произвольную кривую. Далее создайте ее копию(выделить объект и нажать клавишу + на клавиатуре). Отразите копию объект по горизонтали, нажав соответствующую кнопку сверху напанели инструментов.См. Рис. 29
Рис. 28
Разнообразим нашу композицию абстрактным элементом из линий. Возьмите инструмент "Свободная форма"F5.Постройте произвольную кривую. Далее создайте ее копию(выделить объект и нажать клавишу + на клавиатуре). Отразите копию объект по горизонтали, нажав соответствующую кнопку сверху напанели инструментов.См. Рис. 29
 Рис. 29
Примените к данным линиям инструмент "Перетекание". Настройте сверху на панели инструментов необходимое количество объектов перетекания. Также поэкспериментируйте с положением кривых, либо добавлением узлов инструментом "Форма", таким образом можно добиться весьма интересных результатов. См. Рис. 30
Рис. 29
Примените к данным линиям инструмент "Перетекание". Настройте сверху на панели инструментов необходимое количество объектов перетекания. Также поэкспериментируйте с положением кривых, либо добавлением узлов инструментом "Форма", таким образом можно добиться весьма интересных результатов. См. Рис. 30
 Рис.30
Примените к линиям инструмент "Прозрачность", тип прозрачности - однородная.
Соберите нашу композицию. Создайте копии пузырьков, добавьте бликов. Это достаточно творческая работа, у меня получилось следующее. См. Рис. 31
Рис.30
Примените к линиям инструмент "Прозрачность", тип прозрачности - однородная.
Соберите нашу композицию. Создайте копии пузырьков, добавьте бликов. Это достаточно творческая работа, у меня получилось следующее. См. Рис. 31
 Рис. 31
УРОК №5
Рис. 31
УРОК №5
 Step 1
Create new document, whatever size. A4 is fine. Draw the shape of the bird's body using the Free Hand Tool and make it nice with the Shape Tool. This part requires a bit of creativity:)
Step 1
Create new document, whatever size. A4 is fine. Draw the shape of the bird's body using the Free Hand Tool and make it nice with the Shape Tool. This part requires a bit of creativity:)
 Step 2
Color the shape blue. Then Copy the shape and paste in the same place. Now using the Up Arrow key, move the second shape 4 pixels up. And then change the color of the second shape to a lighter blue. For better a effect use the Radial Gradient Fill Tool with a lighter to darker blue. Still the first shape should be darker to get that dark line at the bottom.
Step 2
Color the shape blue. Then Copy the shape and paste in the same place. Now using the Up Arrow key, move the second shape 4 pixels up. And then change the color of the second shape to a lighter blue. For better a effect use the Radial Gradient Fill Tool with a lighter to darker blue. Still the first shape should be darker to get that dark line at the bottom.
 Step 3
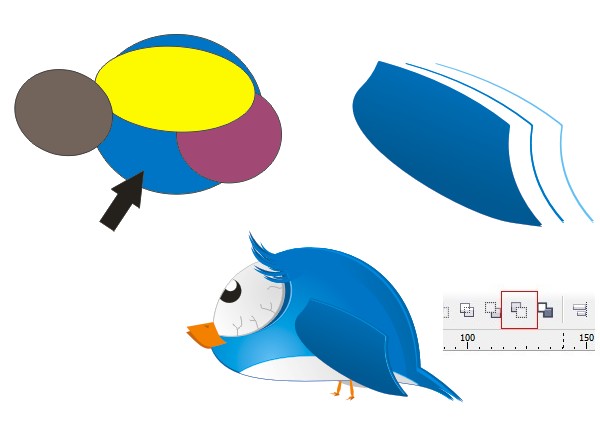
Copy the shape and place it in the white area. Copy it again and paste it. Then make it a bit larger and put it over the smaller one (green on pink example). Using the Back Minus Front option Cut the shape off. Then change it to blue (or use the gradient that we did in last step). And place it on our main shape.
Step 3
Copy the shape and place it in the white area. Copy it again and paste it. Then make it a bit larger and put it over the smaller one (green on pink example). Using the Back Minus Front option Cut the shape off. Then change it to blue (or use the gradient that we did in last step). And place it on our main shape.
 Step 4
Do the same again but cut a smaller, thiner part. Those steps are needed to add some light effects, which make it more 3D.
Step 4
Do the same again but cut a smaller, thiner part. Those steps are needed to add some light effects, which make it more 3D.
 Step 5
This step uses only one simple option: Intersect (marked by red box, shown below). Just as in the steps above, select two object and Intersect. You will get the shape that both object share.
This technique is an easy way to get shapes that you want in many other situations. In the picture below, notice that we used circles on the main shape, then the eye, then the eyeball, etc. Be sure to apply a radial fill to the eye as shown above.
Step 5
This step uses only one simple option: Intersect (marked by red box, shown below). Just as in the steps above, select two object and Intersect. You will get the shape that both object share.
This technique is an easy way to get shapes that you want in many other situations. In the picture below, notice that we used circles on the main shape, then the eye, then the eyeball, etc. Be sure to apply a radial fill to the eye as shown above.
 Step 6
Do the same thing again. This time create the bottom part of the bird (that's the way birds are built, a white patch makes the bird look more real).
Step 6
Do the same thing again. This time create the bottom part of the bird (that's the way birds are built, a white patch makes the bird look more real).
 Step 7
Coming back to using the Back Minus Front option. Cut off the shape of the first eyelash. Than copy, paste, resize, and rotate to put them together. Now copy the whole thing and paste in place, change to a darker blue, rotate a bit, and move it to the back. Lastly, group it and place it on the bird.
Step 7
Coming back to using the Back Minus Front option. Cut off the shape of the first eyelash. Than copy, paste, resize, and rotate to put them together. Now copy the whole thing and paste in place, change to a darker blue, rotate a bit, and move it to the back. Lastly, group it and place it on the bird.
 Step 8
To draw the legs and nose you need to use the Free Hand Tool and make it nice with the Shape Tool. In this step, we want to show you how using the same color, but in different brightness, adds more depth and dimensionality.
Step 8
To draw the legs and nose you need to use the Free Hand Tool and make it nice with the Shape Tool. In this step, we want to show you how using the same color, but in different brightness, adds more depth and dimensionality.
 Step 9
This must be the easiest step because you do do not have to be exact. Just draw away and create some jagged shapes for the eye. The more uneven the better.
Step 9
This must be the easiest step because you do do not have to be exact. Just draw away and create some jagged shapes for the eye. The more uneven the better.
 Step 10
Now let's make the wings. In the image below, you can see again how we cut the shape out of the circle using different circles. Then we rounded the corners a bit using the Shape Tool. Also, we added some light effect, just like in Step 4.
Place the wing on the bird. Also, Copy and Paste In Place the same wing, but change color to gray, move to the back, and move to the left a bit. That gives the effect of the second wing on the other side of the bird (you can see tiny gray part near the legs).
Step 10
Now let's make the wings. In the image below, you can see again how we cut the shape out of the circle using different circles. Then we rounded the corners a bit using the Shape Tool. Also, we added some light effect, just like in Step 4.
Place the wing on the bird. Also, Copy and Paste In Place the same wing, but change color to gray, move to the back, and move to the left a bit. That gives the effect of the second wing on the other side of the bird (you can see tiny gray part near the legs).
 Advertisement
Step 11
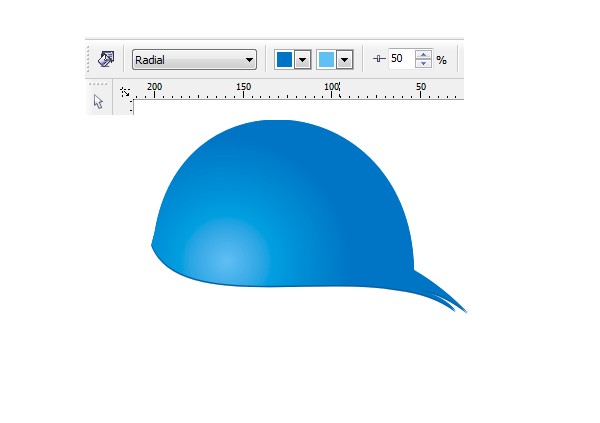
We're almost done. The hat is a simple thing drawn using the Freehand Tool to create the shapes shown below. They each were given different brightness, fills, and a radial gradients was placed on the white stripe to add 3D.
Advertisement
Step 11
We're almost done. The hat is a simple thing drawn using the Freehand Tool to create the shapes shown below. They each were given different brightness, fills, and a radial gradients was placed on the white stripe to add 3D.
 Conclusion
Place the hat on the bird. Add a dark blue ellipse under the hat (some kind of shadow of the hat). And our Quirky looking twitter bird in vectors is done!
Conclusion
Place the hat on the bird. Add a dark blue ellipse under the hat (some kind of shadow of the hat). And our Quirky looking twitter bird in vectors is done!
Рисуем глаз в Corel Draw.

1) В данном уроке, при рисовании фигур, я больше пользовалась инструментом "Свободная рука".
Поэтому сначала набрасываем контур глаза и верхнее веко, форму объектов корректируем с помощью "Формы"

2)Рисуем еще один контур и применяем на него заливку с линейной направленностью. В настройках выставляем цвета: CMYK (0;60;60;40) и (71;89;88;39).

3)С помощью инструмента "Эллипс" рисуем овал (на рисунке обозн. красным контуром), заливаем его розовым цветом (2;16;9;0) применяем на него инструмент "Интерактивная полупрозрачность", линейного типа.

Теперь рисуем такой же небольшой эллипс у основания глаза, немного поворачиваем его и заливаем цветом (10;44;45;0). Обводку убираем.
4)Инструментом "Свободная рука" рисуем еще один объект, заливаем его цветом (3;26;37;0) и применяем "Интерактивную прозрачность" базового типа. Нарисуем еще один штришок, заливаем его цветом (44;79;86;3), к нему также применяется "Интерактивную прозрачность", но уже линейного типа.

5)Возле этого штришка делаем еще один (можно также скопировать первый), который заливаем цветом (3;20;25;0), с применением полупрозрачности.

6)Рисуем поверх наших изображений еще один эллипс, т.е. овал. Заливаем его градиентом с цветами: (0;20;20;0) и (0;20;40;40) и применяем базовую полупрозрачность.

7)Теперь над складочкой века нам необходимо нарисовать следующую фигуру и все тем же эллипсом нарисовать белок глаза. Обе фигуры заливаем белым цветом и применяем линейную полупрозрачность.

8)Далее будем поэтапно рисовать зрачок. Сначала инструментом "Эллипс" нарисуем окружность, зальем ее серым цветом и применим к ней инструмент "Тень" (все настройки показаны на рисунке).
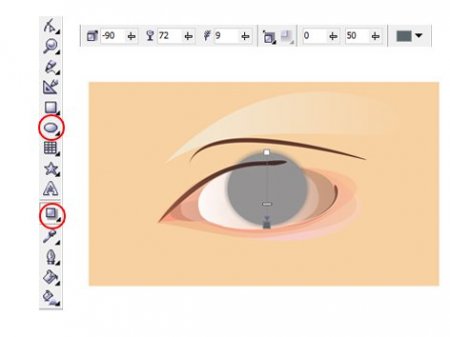
9)На полученную окружность с тенью применяем полупрозрачность.
10)Над глазом, а именно на веке рисуем "Свободной рукой" некое подобие теней для глаз, я залила этот объект розовым цветом (2;16;9;0), делая акцент на естественность, а вы - как кому нравится. Под глазом также рисуем фигуру, изображенную на рисунке. К обеим полученным фигурам применяем линейную полупрозрачность. Я также на верхнее веко добавила еще одну такую же фигуру розового цвета и применила к ней базовую прозрачность.

11)Инструментом "Эллипс" нарисуем вторую окружность поверх первой. Заливаем ее цветом (67;54;81;12) и применяем инструмент полупрозрачности с линейным типом, также к этой окружности добавляем контур темного цвета. Слева нарисуем объект, который будет затемнен, он имеет заливку цветом (4;30;38;0).

12)Нарисуем радужную оболочку глаза, применяя инструменты "Контуры" и "Интерактивное искажение" (искажение вогнутости и выпуклости). Я изобразила два способа получения радужной оболочки. Выходящие за контуры линии я подкорректировала ластиком. Цвет заливки - (78;66;81;46).

13)Рисуем на зрачке еще одну окружность, заливая ее цветом (65;52;74;8) и применяя базовую полупрозрачность.

14)Следующая окружность не содержит заливку, а только серый цвет контура, накладываем ее на изображение.

15)С помощью "Свободной руки" изображаем небольшую окружность, заливаем ее белым цветом и применяем базовую полупрозрачность.

16)Теперь поверх нашего зрачка нарисуем две окружности, одна большая цветом, другая - сам зрачок (обе черного цвета). Большую окружность делаем полупрозрачной (базовый тип).

17)Далее на маленьком зрачке применим градиентный переход (от черного к темно-зеленому).

18)Нарисуем блики и применим базовую полупрозрачность.

19)Изобразим еще один блик, похожий на перевернутое сердце, применим к нему линейную полупрозрачность.

20)Теперь с помощью инструмента "Свободная рука" изобразим реснички, это будут не основные реснички, а только основание. Я, например, просто набросала "от руки", а затем подкорректировала все с помощью "Формы", придала плавность и заостренность.

21)Теперь на полученные "реснички" накладываем тень.

22)А теперь самое интересное! С помощью инструмента "Живопись" рисуем наши "настоящие" реснички на верхнем и нижнем веках. Обратите внимание на то, какую формы кисти я выбрала: она заостренная с двух концов и очень подходит для рисования ресниц.
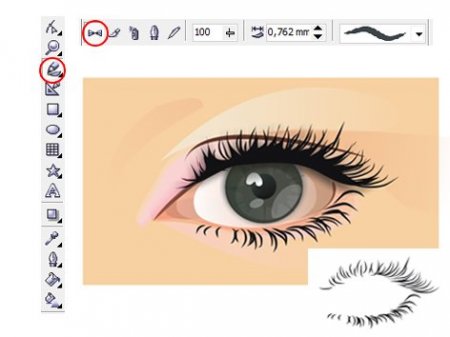
23)Ну, вот в принципе, что у меня и получилось:

Легкий, естественный, дневной макияж, как я того и добивалась.
А теперь для любителей ярко-выраженных глаз предлагаю вариант вечернего макияжа.
1)Создаем обводку вокруг нашего глаза, заливаем ее черным цветом.

2)Применяем на эту фигуру инструмент "Интерактивный контур".

3)Правой клавишей - разбиваем контурную группу на части.

4)Группируем все.

5)Поверх данной фигуры накладываем такую же, просто залитую белым цветом. И, выделив оба полученных объекта, нажимаем на кнопку в верхней панели инструментов. Изображение сверху вырежется на внутреннем.

6)Полученное накладываем на уже готовый глаз и применяем базовую полупрозрачность.

Вот и все! Я дала еще небольшой блеск в глазах:

Немного меняем цвет теней, так сказать корректируем макияж, вот он и готов:

Или так:

УРОК №7

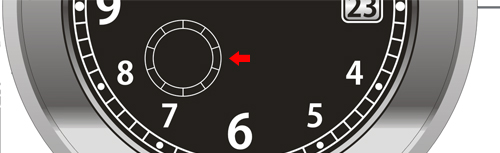
In this tutorial we will learn how to create a steel wristwatch using Corel Draw. The basic technique used in this tutorial is the x, y coordinates position. The x, y coordinates position is very important to obtain symmetrical results. We will also use some gradients to create the steel effect. We'll work with simple technique to achieve great results.
Step 1
Open a new document. On the toolbar, change Units to pixels. Create a 1001px circle using the Ellipse Tool (F7). Put the x, y coordinates position at (0, 0).

Make sure all this toolbars have been checked.

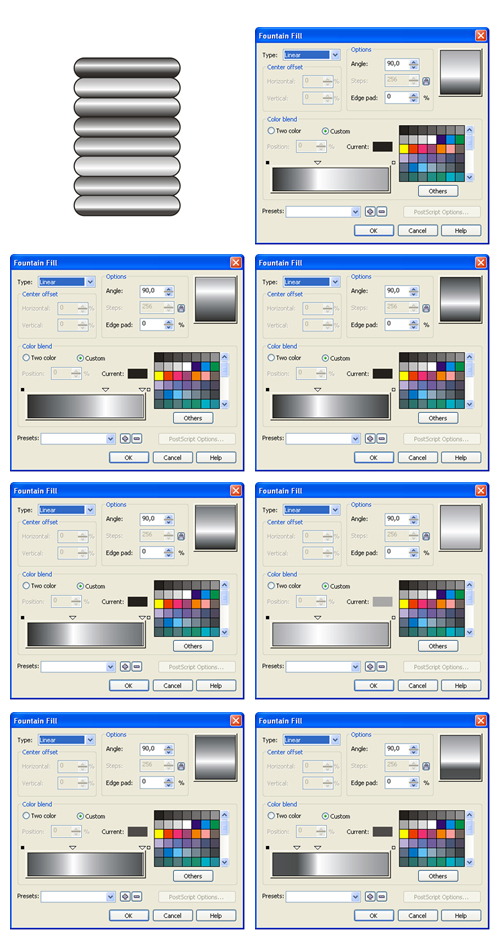
Fill the circle with a Linear Gradient using the Fountain Fill Dialog (F11). Change the Angle to -90°, and the Edge pad to 9%. Then, add one slider in the Gradient Slider. Set the color and position, Start Point at white, Added slider at 30% black; Position at 92%, and End Point at 40% black.

Step 2
Duplicate the circle using copy and paste. I suggest you do not use Command + D (Duplicate command). This is because we need the object position to remain at 0, 0. Change the circle size to 941px. Clear the Outline Color. Now fill the object with a Linear Gradient using the Fountain Fill Dialog (F11), change the Edge pad to 22%. Add a slider in the Gradient Slider. Now set the color and position, Start point at 20% black, Added slider at 70% black; position at 90%, and End point at 10% black.

Step 3
Duplicate the outer circle. Change the size to 921px, then fill with a Linear Gradient using the Fountain Fill Dialog (F11). Change the Edge pad to 22%. Add two sliders in the Gradient Slider. Set the color and position, Start point at white, First slider at 10% black; position at 8%, Second slider at 70% black; position at 90%, and End point at 10% black.

Step 4
Duplicate the outer circle again. Change the size to 750px. Then fill it with a Linear Gradient using the Fountain Fill Dialog (F11). Change the Edge pad to 4%, then add three sliders. Set the color and position, Start point at white, First slider at 10% black; position at 37%, Second slider at 80% black; position at 50%, Third slider at 20% black; position at 76%, End point at 10% black. Open the Outline Color and change its thickness to 1 pt and fill it with a black color.

Step 5
Duplicate the latest circle, change the size to 720px, and fill it with a black color.

Step 6
Duplicate the latest circle, change the size to 700px, and replace the Outline Color with a white color.

Step 7
Use the Pen Tool to draw a vertical line in the middle of the circle. Then change the outline thickness to 1 pt, and fill it with a white color.

Duplicate the line, then rotate to 6°.

Repeat it again and again, but now rotate each line to 12°, 18°, 24°, 30°, 36°, 42°, 48°, 54°, 60°, 66°, 72°, 78°, 84°, and 90°. The result should look like that shown below.

Step 8
Select all lines, then duplicate them. Flip horizontally by clicking on Mirror. Delete the lines at 0°, 30°, 60°, 90°, 120°, and 150°.

Step 9
Duplicate the latest circle and change the size to 650px.

Step 10
Create a 20px circle, put the coordinate position at 0, 338. Fill with cyan color, then remove the Outline Color. Duplicate the circle, put the coordinate position at 0, -338. Fill with white color.

Now select both of them. Duplicate, then rotate to 90°. Change the cyan circle to a white color.

Duplicate again, rotate to 30°, then change the size to 15px.
Do the same, now rotate to 60°, 120°, and 150°.

Step 11
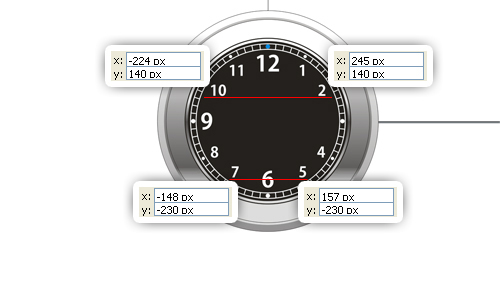
Now let's put the numbers. To obtain a symmetrical result, duplicate the latest circle, change the size to 610px. Use the circle as a boundary and start typing your numbers. Type the numbers "1-12" except number "3". I used Kozuka Gothic Pro B for my font, but you can use your favorite font. For number "12," "6," and number "9," the font size is 24, and the rest is 16.

Since each number has a different width, but the the same height, let's set the y coordinate position for each number, so the numbers will have the same value with their opposite side. See the picture below, number "10" and number "2" have the same y coordinate position, ie 140px. Also, with the number "7" and the number "5," the y coordinate position is at -230px. Delete the boundary circle.
Step 12
On the empty field, create an 80 px by 60 px rectangle using the Rectangle Tool (F6). Draw a rounded rectangle using the Shape Tool (F10).

Put the rounded rectangle to the number three position, then fill with a black color. Open the Outline Pen Dialog by double-clicking on the Outline Color and set the width to 2 pt with the option Behind Fill checked, then fill with a white color.

Step 13
Duplicate the rounded rectangle and scale it to 90%. Remove the Outline Color, then fill it with a Linear Gradient using the Fountain Fill Dialog (F11). Change the Angle to 90°, then add one slider in the Gradient Slider. Set the color and position, Start point at 30% black, Added slider at white; position at 51%, End point at 30% black. Next type the number in the middle. We're done with the numbers.

Step 14
Let's make the analog stopwatch. Duplicate the two latest circles and lines at 0°, 36°, 72°, 108°, and 144° (you need to redraw the line at 0° because it was deleted before), by holding down the Shift key and click the object one by one, use copy and paste. Select them all, then resize to 160px and change the Outline width to 0,5 pt. Resize the inner circle to 126px. Put it to a position shown below.
Step 15
Do the same now with the lines at 0°, 12°, 24°, 36°, 48°, 60°, 72°, 84°, 96°, 108°, 120°, 132°, 144°, 156°, and 168°. Always remember to use the x, y coordinates position to obtain symmetrical result. Put it to a position like pictured below.

Step 16
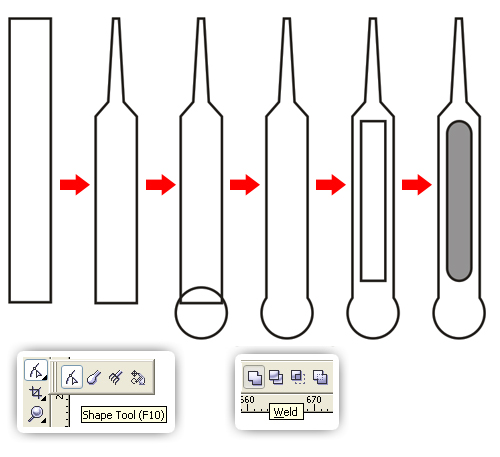
Now let's make the stopwatch hand. In the empty field, create a rectangle using the Rectangle Tool (F6). Now right-click the object, choose Convert to Curves (Command + Q). Change the shape using the Shape Tool (F10). Create a circle and place it under the rectangle as shown. To combine the two objects, select them, then click Weld in the toolbar. Add a small black circle.

Place it in the middle of stopwatch. Size it to fit the stopwatch circle. Then, type the numbers.

Step 17
Create the Vertortuts logo under number twelve. It's very easy, I know you can create the logo just by seeing it. Type "VECTORTUTS" under the logo. But you can use your own logo here if preferred.

Step 18
Let's draw the hand hour. In the empty field, create a rectangle using the Rectangle Tool (F6). Then right-click the object, choose Convert to Curves (Command + Q). Change the shape using the Shape Tool (F10).
Create a circle and place it under the rectangle as shown. To combine the two objects, select them, then click Weld in the toolbar. Add a rectangle in the middle, using the Shape Tool (F10) to create the rounded rectangle, then fill it with a 40% black color. Group (Command + G) them all.
Place it in the middle of watch, rotate to 85°. Use guidelines to help you arrange the object position.

Step 19
Draw the minute hand. See Step 18, but now make it slimmer and longer than the hour hand. Fill it with a 30% black color.

Place it in the middle of the watch, rotate it to 310°. Use guidelines to help you arrange the object position.

Step 20
Last, draw the second hand. In the empty field, create a rectangle using the Rectangle Tool (F6). Then right-click the object, choose Convert to Curves (Command + Q). Change the shape using the Shape Tool (F10).
Create a circle and place it under the rectangle as shown. To combine the two objects, select them, then click Weld in the toolbar. Fill it with a red color, change the Outline Color with a red color too. Now add a small black circle.
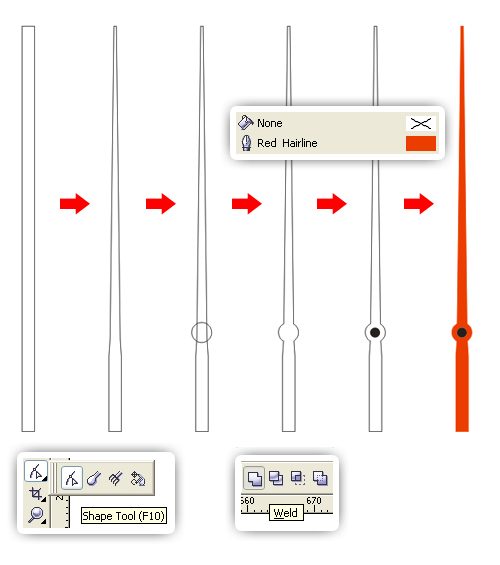
Place it in the middle of the watch, rotate it to 192°. Use guidelines to help you arrange the object position.

Step 21
Now let's make the steel strap. Create a 179 px by 291 px rectangle using the Rectangle Tool (F6). Then right-click the object, choose Convert to Curves (Command +Q). Change the shape using the Shape Tool (F10), shape the rectangle as shown. Fill with a Linear Gradient using the Fountain Fill Dialog (F11). Change the Angle to -90°.
Add seven sliders in the Gradient Slider. Set the color and position, Start point at 40% black, First slider at white; position at 3%, Second slider at 20% black; position at 11%, Third slider at white; position at 17%, Fourth slider at 20% black; position at 24%, Fifth slider at 50% black; position at 42%, Sixth slider at 20% black; position at 83%, Seventh slider at 20% black; position at 94%, End point at 30% black.

Place it at the top of the watch.

Fix it using the Shape Tool(F10).

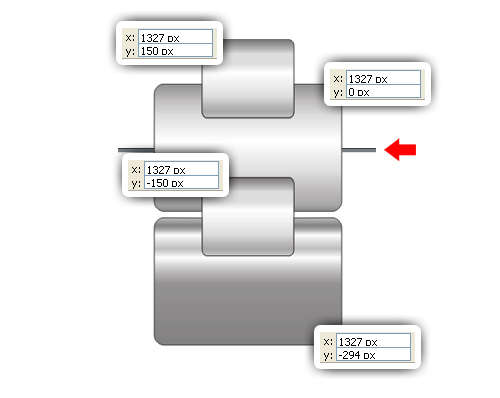
Step 22
Duplicate it three times and put it to the position shown. For the first one, flip horizontally using Mirror, place the coordinate position at -296, 465. For the second one, flip vertically using Mirror, place the coordinate position at 296, -465. For the last one, flip vertically and horizontally using Mirror, place the coordinate position at -296, -465.

Step 23
Create a 411 px by 279 px rectangle using the Rectangle tool (F6), make sure the width is fit with the last object (see picture below). Draw a rounded rectangle using the Shape Tool (F10). Fill it with a Linear Gradient using the Fountain Fill Dialog (F11). Change the Angle to 90°.
Add six sliders in Gradient Slider. Set the color and position, Start point at 50% black, First slider at 40% black; position at 48%, Second slider at white; position at 68%, Third slider at 20% black; position at 75%, Fourth slider at white; position at 86%, Fifth slider at 50% black; position at 93%, Sixth slider at 20% black; position at 99%, End point at 80% black.

Step 24
Duplicate the rounded rectangle, modify the Linear Gradient. Change the Angle to -90°. Add seven sliders in the Gradient Slider. Set the color and position, Start point at 40% black, First slider at 20% black; position at 12%, Second slider at 10% black; position at 23%, Third slider at white; position at 43%, Fourth slider at 10% black; position at 68%, Fifth slider at 20% black; position at 79%, Sixth slider at 30% black; position at 93%, Seventh slider at 50% black; position at 99%, End point at 50% black.

Step 25
Create a 202 px by 162 px rectangle using the Rectangle tool (F6), but now smaller by about 50% from before. Draw a rounded rectangle using the Shape Tool (F10). Fill it with a Linear Gradient using the Fountain Fill Dialog (F11). Change the Angle to -90°.
Add six sliders in the Gradient Slider. Set the color and position, Start point at 50% black, First slider at 30% black; position at 7%, Second slider at 10% black; position at 15%, Third slider at 10% black; position at 28%, Fourth slider at white; position at 39%, Fifth slider at 10% black; position at 70%, Sixth slider at 30% black; position at 89%, End point at 10% black.

Step 26
Arrange the position like shown below. Remember to use x,y coordinates position to get symmetric result. Order the large rounded rectangles to the back of page (Command + End).
Select them all. Use the Simplify command in the toolbar. The small rounded rectangle will trim the large one.

Select the small rounded rectangle, change the height scale to 95%, place it at the center between the two large rectangles. The result should be like this:

Place it at the top of the watch.

Fix it using the Shape Tool (F10). Do not use the Simplify command. The Simplify command will change the gradient.

You can Group (Command + G) the steel strap, then duplicate it. Flip it vertically using Mirror and place it at the bottom of the watch as shown.

Step 27
In the empty field, create a rectangle using the Rectangle Tool (F6), use the Shape Tool (F10) to create the rounded rectangle. Fill it with a Linear Gradient using the Fountain Fill Dialog (F11). Change the Angle to 90°.
Add two sliders in Gradient Slider. Set the color and position, Start point at black, First slider at 90% black; position at 26%, Second slider at white; position at 63%, End point at 90% black.

Duplicate the rounded rectangle seven times. For each rounded rectangle, modify the gradient randomly. Group (Command + G) them.
Step 28
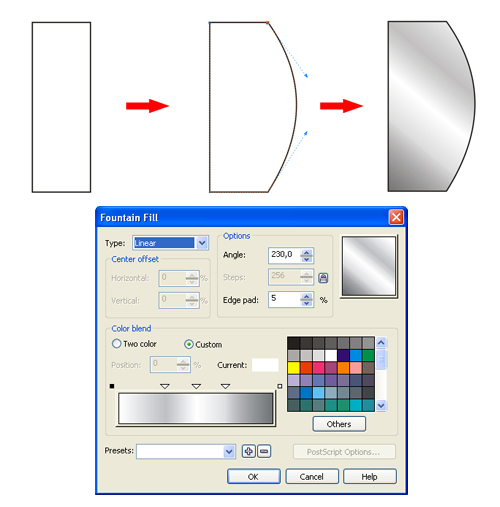
Create a rectangle using the Rectangle Tool (F6). Then right-click the object, choose Convert to Curves (Command + Q). Change the shape using the Shape Tool (F10) as shown. Fill it with a Linear Gradient using the Fountain Fill Dialog (F11). Change the Angle to 230° and Edge pad to 5%.
Add three sliders in Gradient Slider. Set the color and position, Start point at white, First slider at 20% black; position at 30%, Second slider at white; position at 50%, Third slider at 10% black; position at 70%, End point at 60% black.
Arrange the object with the rounded rectangle.

Order the object to the back of page (Command + End). Select them all and use the Simplify command in the toolbar.

The result should be like this:

Place it at the right side of the watch, order it to back of page (Command + End). Select the object and the outer circle of the watch, then use the Simplify command in the toolbar.

Step 29
Next create a rectangle using the Rectangle Tool (F6). Then right-click the object, choose Convert to Curves (Command + Q). Change the shape using the Shape Tool (F10) as shown. Fill it with a Linear Gradient using the Fountain Fill Dialog (F11). Change the Angle to 5° and the Edge pad to 3%.
Add three sliders in the Gradient Slider. Set the color and position, Start point at 50% black, First slider at 30% black; position at 47%, Second slider at 10% black; position at 61%, Third slider at white; position at 69%, End point at 10% black.

Place it like shown below. Fix it and Order it to back of page (Command + End). Select the object and the outer circle of the watch, use the Simplify command in the toolbar. Duplicate the object and flip vertically.

The result should be like this:

Step 30
Now create a 38 px by 74 px rectangle using the Rectangle Tool (F6). Fill it with a Linear Gradient using the Fountain Fill Dialog (F11). Change the Angle to -90°. Add six sliders in the Gradient Slider. Set the color and position, Start point at 40% black, First slider at 10% black; position at 11%, Second slider at 20% black; position at 24%, Third slider at 90% black; position at 42%, Fourth slider at 20% black; position at 61%, Fifth slider at white; position at 77%, Sixth slider at 10% black; position at 90%, End point at 50% black.

Step 31
Now create a 47 px by 103 px rectangle using the Rectangle Tool (F6). Draw a rounded rectangle using the Shape Tool (F10). Fill it with a Linear Gradient using the Fountain Fill Dialog (F11). Change the Angle to -90°.
Add six sliders in the Gradient Slider. Set the color and position, Start point at 40% black, First slider at 10% black; position at 11%, Second slider at 50% black; position at 28%, Third slider at 90% black; position at 37%, Fourth slider at 50% black; position at 47%, Fifth slider at white; position at 77%, Sixth slider at 10% black; position at 90%, End point at 50% black.

Step 32
Create a 96 px vertical line with three point (see the picture below) using the Pen Tool. Modify the object using the Shape Tool (F10). Fill it with a Linear Gradient using the Fountain Fill Dialog (F11). Change the Angle to 50°.
Add three sliders in the Gradient Slider. Set the color and position, Start point at black, First slider at 40% black; position at 29%, Second slider at 10% black; position at 58%, Third slider at 70% black; position at 78%, End point at 80% black.

Advertisement
Step 33
Put the three of them at the same y coordinate position, arrange them as shown. Then rotate about 25° and Group (Command + G) them.

Place it at the right side of the watch like shown below. Order the object to the back of page (Command + End). Select the object and the outer circle of the watch, use the Simplify command in the toolbar. Duplicate the object and flip it vertically.

The result should be like this:

Your wristwatch is done.

Final Image
After adding a simple gradient background he final image is below. Use coordinates positioning and other simple techniques to create great results.

УРОК №8

1. По исходному изображению делаем контуры лепестков с помощью Freehand Tool,рисуем с захлёстом на соседние и обязательно замыкаем крнтур. Инструментом Shape Tool подправляем неровности.
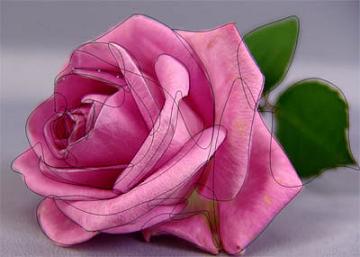
2. Заливаем каждый лепесток розовым цветом, не забывая об оттенках. Закрашиваем листья и черенок. На этом этапе для избежания путаницы удобно пользоваться Object Mananger. Кликая на лепестке, можно легко перемещать объекты друг относительно друга, укладываю лепестки в определённую иерархию.

3. Градиентной заливкой оживляем наши лепестки, придавая некий объём. Убираем обводку.

4. Для большей убедительности кое-где добавляем теней. Делается это так. Рисуем фигуру, копируем, уменьшаем, располагаем меньшую поверх большой и применяем перетекание. И затем выставляем прозрачность 97%(можно сразу выставить). Такие тени можно несколько раз скопировать, изменив размер и поместить туда, где им и место.

5. Теперь берём кисть из группы Artistic Media Tool и чуть небрежно делаем лёгкий контур, имитирующий блики. Рисуем прожилки листику.

6. Тень под самой розой я сделала так. Нарисовала элипс, перевела его в кривую и изменила общий силуэт до странной закорючки, как сама тень  . Залила его цветом. Потом применила к нему эффект тени (чёрный цвет), а сам элипс (то что от него осталось) сдела 100% прозрачным. Вокруг розы голубой ореол-это тоже тень.
И не сложно всё это, как оказалось.
УРОК №9
Step 1 Basic Elements
In this tutorial I'm using CorelDraw X4.
OK, let's get started!
I will explain the basic elements and the steps to create a vector based eye.
1. Eye Body
2. Eye Liner
3. Pupil
4. Eye Lashes

Step 2 Working with Bezier Tools
Now that you know the steps and elements, we will begin step 1, which is creating the eye body.
1. Make a line by using the "Bezier Tool", after that copy and paste it (Control + C, Control + V)
2. Shape it by using "Shape Tool", right click at the center of the line and find "convert to curves " in the top toolbar.
Left click the start and end of the lines there will be two dotted arrow, left click and drag them in order to shape the line.
Repeat with the second line, and shape it like in the picture
3. Now, select all the lines using the "Pick Tool" and combine it by pressing Control + L,
after that go to the "Shape Tool" and select each corner of the shape and find "Join two
nodes" in the top toolbar and click it.
4. Done

Step 3 Coloring
Now we are going to colorize the body of the eye. Go to the "Fountain Fill Tool" which is in the left bottom toolbar or just press F11.
Set the color like in the picture below,
to create a custom color double click the color box, and select others in the bottom color palette
and press OK.

Click the eye body with the "Pick Tool",
to remove the line in the eye body go to the right color panel, you will see the first color box is X spotted, right click it,
if you've done this correctly it will look like the image below.

Step 4 Creating Eyeliner
Now we will create the eyeliner.
Draw a shape by using the "Bezier Tool", create a shape like in
the picture below, make sure that the last click is connect with the first click or else you
cannot colorize the shape.
Shape the eyeliner by using the "Shape Tool", right click in between the two nodes or corners and find "convert to curves tool" at the top corner and click it.
After that you will see two dotted arrows, click and drag them to shape it, apply this to all the
lines until you make a shape like in the picture.


