


The first thing to start with is to analyze the current situation of your piece of land.
1. Get a master plan from an administration organs (map of the area with all objects marked).
2. Mark all ditches and creeks of the area on the map,
3. All water sources,
4. Puddles and reservoirs,
5. Sewage system and drain holes
6. Waterlogged territories
7. Places of after-rainfall flooding
8. Footpaths
9. Trees
10. Fencing
11. Electrical tables
12. Internet / communication cables
13. Plumbing system
14. Gas pipelines
15. Bushes and shrubs
16. Children playgrounds
17. Sports grounds
18. Gardens
19. Planned construction
20. Waste accumulation places.
The second thing to do is the analysis to place:
1. Water collecting system (from roofs)
2. 1-2 small lakes
3. A creek
4. A swamp
5. Meadows and garden beds
6. Bushes
7. Trees and forest
The third stage is to find out the following:
1. A list of fruit trees, berries and vegetables able to grow in the area.
2. An annual schedule of planting.
3. A schedule of harvest.
4. A schedule of watering and check of plants compatibility (to make sure that chosen plants can co-exist naturally).
5. Lighting conditions.
6. The ways of plantsТ breeding
7. Soil conditions
8. And other parameters
Fourth thing is creating a landscape design itself:
1. Planning plantings
2. Considering sunlight conditions
3. Considering west/east/north/south directions.
4. Considering a wind rose,
5. Seasonality of rainfalls,
6. Children and playgrounds
7. Pets and wild animals
8. Bird feeders and nests
9. Boxes for insects
10. Just turn on your imagination and create stuff![7]
A guide to creating garden beds out of waste.
The idea is to create a raised bed. First thing to do is to dig a footpath to be able to bring up planting materials and bring out the harvest. Add some compost to soil of garden beds. Then it is time to plant seeds and add mulch. Mulch of straw and cut grass protects the soil and helps to preserve water and keep the optimal temperature level. Mulch nourishes soilТs microorganisms and is good for plantsТ roots. Raised beds are useful when itТs wet, where it rains a lot.
But if the climateТs dry itТs better to make beds in some depth. They preserve water too. A grid is used to cover plants from too much sunlight. The goal is to decrease a dehydration effect of evaporation.
One needs 1m3 of compost to make 1000 m2 of garden beds. One can use even more compost: 20m3 for 1 ha. ItТs only for the first time, because you start a natural process of bringing nutrients back to plants.
Then we start planting into beds. After planting itТs time to do mulching. Mulch is to protect plants from too much sunlight, evaporation, rain washouts. Mulch is like an isolation covering. It retains water just like litter in woods. 30% of mulchТs mass is water. So if a thickness of mulch is 8 cm, thereТs approximately 3 cm of water. Mulched garden bed needs 10 times less watering. This feature makes them super-efficient.
|
|
|
How to make garden beds quickly.
I do use recycled wood, paper, carton, vegetable parings, mulch made of leaves. It is going to be a good food for soil. Sometimes you can use raw stuff like old books, paper bags, etc. Paper is a good material to retain water. The goal of using mulch is to make micro flora and fauna УfeelФ natural. One must loosen mulch and shake it. Then one is to add some compost and press it a little bit. Then itТs time to plant seeds.
So it is so easy and quick to make a garden bed. You have everything you need. The fertile layer of soil will add 1-5 cm annually. It is very important to take care of soil when you do permacultural works.
9.2. Permaculture Ц is the part of clean recycling idea.
A guide to creating seed banks.
Maintaining a variety of seeds and preserving them is a task of great importance if you want to provide a stable food supply. If we can make all people around grow and share organic food, everyone is a lucky winner.
Seed sorting takes places on the conveyor line of the 5th zone of a recycling complex. Seeds are to be identified and transported to the seed bank.
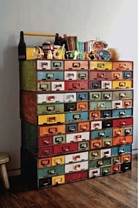
fig. 27 A nice locker for seed storage.
Make records.
As soon as seeds are received and planted, itТs necessary to make records:
Х Date of planting. What was the weather like?
Х Where were they planted? Outdoors, in a greenhouse? Did you start growing seedling in wet paper?
Х The light is natural or electrical?
Х How many days does it take for seeds to germinate?
Х What amount of seeds did germinate out of total seeds planted?
Х How many of them died? How many was strong and viable?
Х When were they transplanted outdoors?
Х Which kind of soil were they transplanted into?
Х When did blooming start? When was the first harvest?
Х What was fruitТs taste like? Are they better raw or boiled?
Those ones above are just some examples of such information you have to record. More detailed your records are, more informed you are about planting them next year. ItТs about getting an experience and sharing it.
Seed storage
You donТt have to wait till fall comes to start harvesting your seeds. Such herbs as basil and fennel can start producing seeds quite early. In warm periods you can preserve many seeds of fruit and vegetables like strawberries, tomatoes, peppers and beans as soon as they get ripe. Do some research on the best way of seed collecting and storage.
Share the experience
Ј Regularly share the information with members of your seed bank, even if you communicate via skype or e-mail.
Ј Create a shared database (Google Drive electronic table, for example) for timely updates tracking, do converse about your successes and failures. Keep the journal of planting, describing plants, the place and date of planting.
Ј ItТs even better If you can meet offline! You can sell fruit you have grown and compare quality, sizes, etc. of different sorts grown in different areas.
If you feel happy about storing seeds and sharing knowledge, you can involve new members in your community. Start with your neighbors, local organization that deal with seeds, agricultural and permacultural clubs (winegrowers, beekeepers, etc). Send seeds to your friends, even if they are far away. I share my seed bank with my friends from 3 different areas, we not only exchange but we also make records in a shared database.
Shared seed banks are a perspective idea. You can meet many enthusiastic people, and educate little children.
|
|
|
Creating a seed bank. First steps:
Creating a private seed bank is an important step to save a natural biodiversity and develop an idea of organic farming.
The main goals of seed bank are preserving a cultural heritage, revival of humane culture of consumption and life cycles.
If you have your own natural seeds, you can easily grow fruit and vegetables every year. And you donТt worry about their origin.
Nowadays, hybrid seeds from Europe actively replace our sorts in a market.
To save biodiversity, culture and traditions we must actively grow and eat plants our grandfathers used to grow and eat. It will recover our ecosystems and will give a good health to our children.
We make records in a simple table in our Google Docs, which is getting more complex with new information added by our seed bank community.

So we invite you to join us, itТs easy:
1. Collect your domestic seeds and store them in a dry place.
2. Add your seeds to a shared table.
3. Post photos of your seeds, plants and fruit in a community blog.
4. Make friends exchange seeds and develop a seed bank.
Together we can do it easily and quickly.
Saving is easy.
If you want to save rare seeds of plants you grow, please do not grow different sorts in one place. Tomatoes, peppers, beet, zucchinis, broccoli, cabbage are objects of xenogamy, so anyway you will get hybrid seeds. Quickness of xenogamy is pretty low, less than 5% for some sorts, itТs better not to do that if you really want to get clean natural seeds.
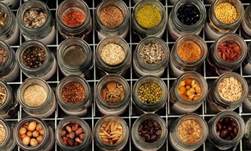
fig.28 Seed bank

